Installing the Motherboard

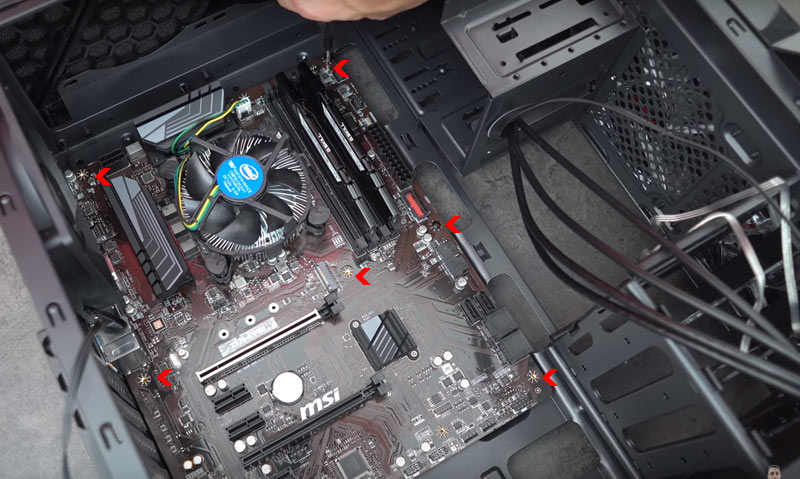
Arrows indicate where to insert screws while installing the motherboard
By now, the power supply is in place inside the case. The processor, the cooler, and RAM have been installed on the motherboard. It is time to lay the motherboard in its resting place – inside the PC case.
Locate the I/O shield, a flat piece of shiny metal that came with the motherboard. The I/O shield is important for protecting the PC components from EMI (Electromagnetic Interference). It has cutouts for most of the ports at the back of the PC case.

IO Shield
To install the motherboard, follow these steps,
- Slide the I/O shield into place (you should see the provided cutout for it), and it should snap into position firmly.
- Hover the motherboard over the PC case back-plate to locate standoffs that match your board. Standoffs are provided for most motherboard sizes. If standoffs are not pre-installed on your PC case, you should find them in the case packaging. Install them in the four corners of the back plate to hold your motherboard.
- Next, align the motherboard with the I/O shield. You should see standoffs where you need to place the supplied screws. Gently place the board in position.
- Fix the screws with a screwdriver. Do not over-tighten. Just enough to hold the motherboard securely. Check to ensure all four screws are intact.
Installing the Storage Drives
So far, everything is looking good. Next, we install our storage drives. You should probably have two types of drives, an SSD and a traditional hard drive. The SSD is the lighter and smaller of the two.
To install the SSD,
- Attach the drive to the bracket with the supplied screws
- Slide the bracket that came with the attached SSD into a drive bay. Attach it with the supplied screws.
To install the mechanical Hard disk drive,
- Remove the HDD bracket from one of the drive bays, preferably the one next to the installed SSD bay
- Insert the mechanical hard drive into the bracket
- Attach the drive to the bracket using screws or in some cases, a screw-less mechanism. In this case, as soon as you push it in, it should snap into place
- Slide the bracket with the attached drive back into the bay.
In some cases, you have an M.2 NVMe drive. All you have to do is locate the M.2 socket on the motherboard. It’s usually smaller in length. Simply align the drive and push it into the slot. It’s that simple.
Next, we install the optical drive.
RELATED ARTICLE

The Best 4K Video Editing PC Build
Build the best 4K Editing PC with recommendations for each hardware.
Installing the Optical Drives (Optional)

Your configuration may include an optical drive, maybe a Blu-ray or DVD drive. Well, they both have the same installation procedure. You should see the SATA cable and screws that came bundled with the drive. Keep them because you’re going to need them later.
To install the optical drive,
- Slide the drive into the topmost drive bay on your PC case
- Use the included screws to fasten it to the case, on both sides.
Installing the Graphics Card
This is probably the last thing to do. We chose to install this last because it occupies space on the board, and might interfere with other installation steps above. Your graphics card should come with an additional power cable or two, a software disc, and the manual.

To install the graphics card,
- Unscrew the PCI case brackets at the back of the case that aligns with the PCI Express slot you intend to use
- Locate the PCI Express slot on the motherboard
- Pull back the retaining clip at the end of the slot
- Align the graphics card on the slot and push it firmly into the slot. The clip should snap into place, holding the card securely
- Gently screw the card in position with a screw at the back of the case. You should see the provision for a screw at the top of the metal bracket at the end of the card.
So far, so good. Next, we plug everything in.
Connecting all components
Now that we have installed all components, it’s time to connect everything together. We’ll start with the motherboard connectors. We assume you are using a modular power supply.
- Motherboard: The PSU offers a single power cable for the board: a 24-pin ATX cable. You should see it together with other cables from the power supply – it’s the one with the largest connector. Push the connector firmly and evenly into the slot on the motherboard, it should snap into place with a ‘click’ sound. Connect the other end to the appropriate socket on the power supply.
- Processor: Locate the 8-pin processor power cable. Press it into the slot on the motherboard, next to the processor. Connect it to the appropriate socket on the power supply, that is, if you are using a modular power supply.
- SSD and HDD: Solid State Drives and traditional hard drives use SATA connectors for data transmission to the motherboard. The SATA connectors are the 15-pin flat connectors with a bracket on one side to ensure plugging them in one way.
Plug the connectors to the drives, then plug the other end into the motherboard SATA sockets.
The SATA ports on the motherboard are labeled SATA0, SATA1, SATA2, etc. It is advisable to install the boot drive to SATA0, the traditional hard drive to SATA 1, and the optical drive to SATA2. If you bought more than one traditional hard drive, you can connect that to SATA3.
Likewise, attach appropriate power connectors from the power supply to the drives.
- Optical Drive: Connect the optical drive with the included SATA cable. Look for a power connector from the power supply and attach it to the drive.
- Graphics Card: Next, connect the graphics card to a power slot on the power supply, using the included power cable.
- Front-panel USB/Audio: These front panel headers control the USB, the power button, the reset button, the HDD activity light, and the power LED, all on the front of your case.

To connect the front-panel header pins, you must consult your motherboard manual. These pins are located on one side of the motherboard. You should exercise care when plugging in these small connectors, which is why you should look at the motherboard manual for information as to the layout of these pins and to know which pin plugs into which socket.
To make things easier for you, each little socket on the motherboard is labeled with the corresponding pin name, which you can easily see on the pins. Plug them in carefully until all are secure.
- Case Fans: In case your PC case came with fans installed for a more cooling effect, simply connect the fans to the appropriate power socket on the power supply.
Cable Management

Cable management is recommended for better airflow
Now that all components are successfully installed, we’ll turn our attention to the cables. Most cases have provisions for better cable management, in which case you don’t have much work to do.
Many cases have a covering that hides the bundle of cables coming out of the power supply, allowing for a neater interior. Yet some cases have provision for routing the cables under the motherboard back-plate, completely hiding them from view.
The major purpose of cable management is to ensure that your PC maintains better airflow because cables can block fans and air movement, thereby increasing the ambient temperature inside your PC. This is not good for your components.
A second reason is you want to make it easier to find the cables you need to unplug when you add or remove components from your PC, in case of an upgrade. Finally, you want to make your PC innards look smart and great. Nobody likes looking at the cluttered bowels of a PC!
What you need for cable management,
- Velcro straps
- Zip ties
- Twist ties
You can easily get these from your local hardware store. The best is Velcro, as it is flexible. Zip ties aren’t that flexible. For instance, if you need to add or remove a cable from the bundle of cables, you will have to cut the zip tie and replace it when you are done.
This is not a good option if you frequently add or remove components from your PC, that’s why we recommend Velcro straps.
Look out for tie-down points on your PC case (if available), and use these to secure the zip ties or twist ties if you are using these to manage your cables. Some cases have clips for holding large cable bundles. Take advantage of this as much as possible. In the end, your PC cables should be safely out of the way, making for a much neater interior.
RELATED ARTICLE

Build a Gaming PC for all budgets
Thinking of building a gaming PC? This guide shows you how for all budgets
Finishing Up
Phew! Having come this far, you can see how easy and fun it was to build your own PC. As part of the finishing touches, make sure all cables are securely connected. A loosely connected cable could give you problems later. Also, make sure the RAM is firmly in place. You can double-check by pressing down on the sticks once more. Do the same for the graphics card.
Once everything is good, plug in your monitor using the supplied cables. You may want to use the DVI or DisplayPort, or the more popular HDMI. It’s all up to your preference. Now is the time to connect your keyboard and mouse. If it’s a wireless keyboard, simply plug the little USB adapter into a free USB socket on the case.
Your hard work is about to pay off, except that, eerrh, your operating system isn’t installed yet. Never mind, we’ll come to that shortly. Well, at this point, take a deep breath, and hit your power button. The system should display the POST (Power-On Self-Test) screen with the technical mumbo-jumbo. After the initial POST screen, the PC should ask for an operating system. Of course, we’ll do that. Just stay with us.
If your PC refuses to power up, double-check all the connectors, that is, after switching off the power supply. A loose RAM module, a loosely connected cable, any of these could hinder a successful boot.
Well, if the PC keeps asking for a boot operating system, it’s time to install one.
Install Windows 10
We choose Windows 10 because it is the latest operating system. It is also fast, stable, and user-friendly. If you haven’t gotten a copy before now, head over to Amazon and order Windows 10. Otherwise, let’s proceed.
Most Windows 10 installations come in a USB flash drive or a DVD. If you have one already, plug it into one of your USB ports, and power on your PC. If you’ve got a disc, slide it into the optical drive tray. Some motherboard BIOS will automatically boot from the flash drive. If not, you have to force the PC to boot from your flash.
You can do that by accessing the CMOS (Computer Metal Oxide Semiconductor) settings, which can be accessed during POST. The CMOS is software that is stored on a chip on the motherboard, that controls most of your high-level PC settings. The system battery makes sure those values are preserved, even when the PC is turned off.
RELATED ARTICLE

The MAC vs Windows War and the rest of us
A look at the age-old rivalry between Microsoft and Apple…
Anyways, just look for the prompt “Press the DELETE key to enter Setup”. On some motherboards, it could be F2 or F10. Just press the required key to enter the CMOS setup. Once you are in CMOS setup, look for the section labeled “BOOT” or “BOOT SETTINGS”. Under this section, look for the setting labeled “BOOT PRIORITY” or something similar. Select the flash drive or CD/DVD as the first boot device and hit “ENTER” on the keyboard to finalize.
Exit the CMOS setup.
Your computer should restart. Look for the prompt, “PRESS ANY KEY TO BOOT FROM CD OR DVD OR USB”. Simply press any key. The Windows setup starts. At this point, just follow the instructions until the installation is done.
Drivers, Software…
Congratulations! You made it. Once your Windows installation completes, the next thing you should do is install drivers for your graphics card and other important drivers. It is advisable to go online and download the latest graphics card drivers for your graphics card. Install the important software you need, sit back and enjoy your PC. You can go ahead and pop a bottle of champagne. You deserve one.
Concluding thoughts
Building a PC all by yourself isn’t rocket science. You just have to know what to plug in and where. If you need more help you can always reach out to us by utilizing the comment section below. Have a blast!

